
If you’re looking for a simple but meaningful way to elevate your Easter baskets this year, these personalized name tags are such a sweet touch. They’re one of those projects that look high-end but are actually super doable—especially if you have a laser cutter on hand.
Today I’m walking you through how to create your own Easter basket name tags using the design from Atomm. You can grab the exact file here:
✨ Why You’ll Love This Project
These tags aren’t just cute—they’re keepsakes. Instead of disposable paper tags, you’re making something that can be reused year after year.
They’re perfect for:
- Easter baskets for kids or grandkids
- Place settings for Easter brunch
- Gift toppers
- Spring décor accents
And let’s be honest… anything personalized just feels extra special 💛
🧰 Materials You’ll Need
To get started, gather the following:
- Basswood (or your preferred laser-safe wood)
- Laser cutter (like xTool, Glowforge, etc.)
- Craft paint (I used a glitter craft paint, but pastels also work beautifully for Easter)
- Small paint brushes or sponge brushes
- Twine, or ribbon
- Sandpaper (optional for smooth edges)
- Titebond Wood glue (if your design has layered elements)
🖥️ Step 1: Download & Prep Your File
Head over to the project on Atomm and download the design file.
Open it in your laser software (like XCS if you’re using xTool). From there:
- Resize if needed
- Double-check cut vs. score layers
- Adjust settings based on your material
- Create names for your tags. I used the cuttle.com Weld and Score (it’s a free template that creates an SVG file for your name)
🔥 Step 2: Cut Your Design
Place your basswood into the laser and start cutting.
A few tips:
- Make sure your wood is flat to avoid uneven cuts
- Run a test cut if you’re unsure about your settings (XTool is awesome with this, I have never had to change my settings, only with scoring and engraving if I want it darker)
- Clean off any residue after cutting (a magic eraser or light sanding works great)
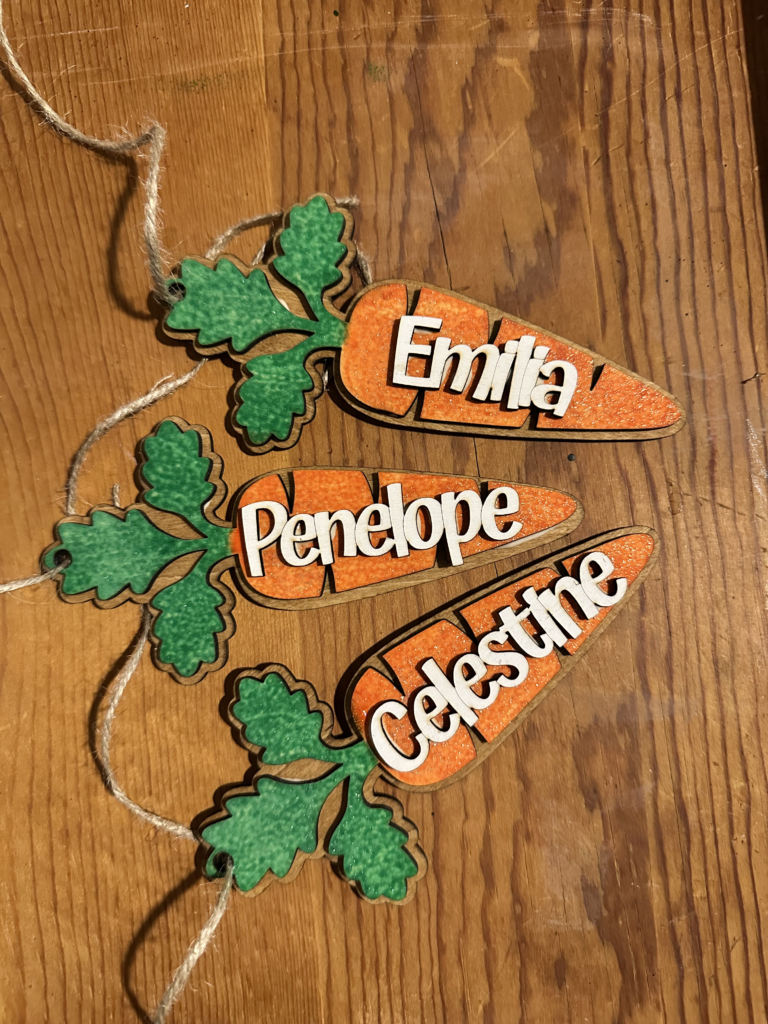
🎨 Step 3: Paint & Personalize
This is where the magic happens ✨
- Paint the name layer
- Leave the base natural for a rustic look—or paint it white or stain it for a clean finish
- Paint the carrot portion and the stem portion of the tag
Let everything dry completely before assembling.
🧩 Step 4: Assemble
If your tag has multiple layers:
- Use a small amount of wood glue
- Align carefully and press gently
- Let dry fully before handling
🎀 Step 5: Attach to Your Basket
Finish it off by threading ribbon or twine through the hole and tying it onto your basket.
Pro tip: Match your ribbon to your basket theme for that cohesive Pinterest-worthy look 😉
💡 Creative Variations
Once you make one, you’ll want to make more—trust me.
Try:
- Different shapes (bunnies, eggs, crosses)
- Layered acrylic + wood combos
- Neutral farmhouse tones or bold spring colors
- Adding a year on the back to create a keepsake collection
🌷 Final Thoughts
These Easter basket name tags are one of those projects that feel small but make a big impact. They add a personal, thoughtful detail that people notice—and they’re something your family can look forward to pulling out every year.
If you make these, I’d love to know—are you going pastel, neutral, or full-on colorful this year?